

To get a $10 discount on My Memories Suite 9 software use coupon code STMMMS66552.
Find my previous tutorials here:
1. How to create your first layout with MMS9 Part 1
2. How to create your first layout with MMS9 Part 2
Create an artsy layout with My Memories Suite 9
Welcome to my new designer tip
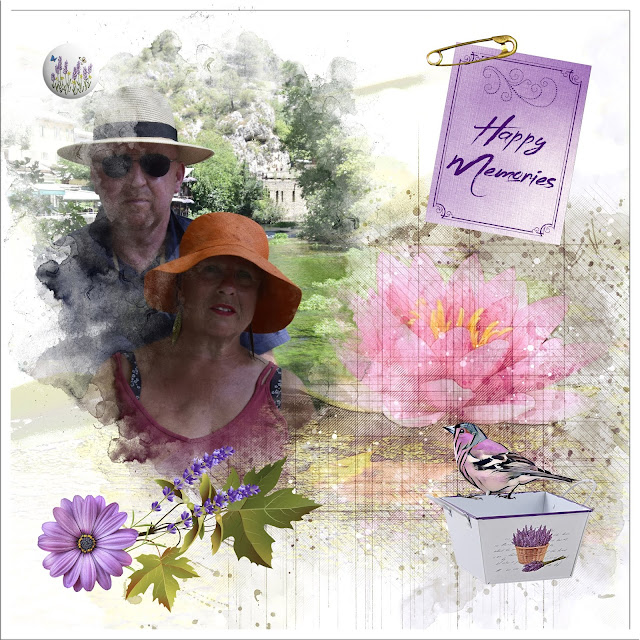
Did you imagine that you would be able to create a layout like this one, with such an easy software as My Memories Suite 9 ? I’m sure you never did!
I’ll show you how you can do it very easily.
You’ll learn to put a picture in a mask and some elements to decorate your page.
For this tip, you need my freebie kit Lavender Mini. You can download it for free until September 7th. And here is a free mask I offer you: FREEBIE.
Download the mask and place it in the embellishments folder of my Lavender Mini kit.
You are now ready to create your layout.
1. Open My Memories Suite 9.
2. Click on design, photobook size 12” x 12”. If you don’t remember how to do, you can find my first lesson: How to create your first layout with MMS9

*Remember: Each part of the kit is in different folders.
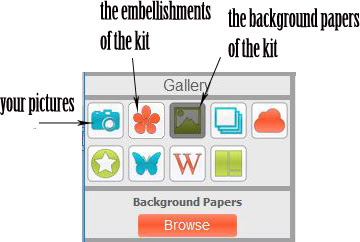
3. Click first on backgrounds gallery icon. Browse to find the folder with the background papers you want to use, select it and click select folder.
4. Do the same for the embellishments & pictures. If you range your pictures in folders on your hard disk, it’ll be easier for you to find them.
5. Click the Background icon in the gallery. There is only one paper. Double click on it to add it as background paper for your layout.
6. Click the Embellishments icon in the gallery. They will appear on the left of the screen.

7. Go down the elements to select the mask. Double-click on it to add it to your layout.
8. The mask is placed at the center of the layout, with its real size. Change its size and move it to place it on the left of the layout.

9. When the mask is selected, click on the control panel (on the right of the screen) and select add Photos.

10. Select the folder and then the photo you want to use in the mask.

This is my result:

Not really the best result I wanted! We’ll have to do some more work!
11. In the control panel, click on EDIT (your mask is still selected). The position screen appears.

12. Move the picture so that the part you want to see fits the mask.

13. Click OK to see the result.

14. We’ll have to edit again until we find the right place for our picture.

Yesss! That’s it!
When you are used to using masks, you know directly how to place your picture. I just wanted to show you that you can edit several times, until you get the best result.
You can now move the mask, change its size if you want, to place it where you like. The mask and the photo are only one element.

15. Now, all you have to do is to add some elements as you learned in my previous lesson.

LAST BUT NOT LEAST: ADD SHADOW TO YOUR ELEMENTS. Not on the mask!!!
This is something beginners often forget, but shadow is very important to give some relief to your layout.
CONGRATULATIONS
Your layout is finished.
Your layout is finished.
It’s now time to save your work:
Click on Menu File and choose Save or CTRL + S on the keyboard. Give a name to your album. I named mine Lavender Land.
Important:
What you have saved is THE CREATION OF THE LAYOUT. It is not a JPG file.
Export your layout as a JPG
First of all, you have to delete all the blank pages that we did not use for that exercise.

Select them. Click on one of them with the right button of your mouse. You get a contextual menu.

Now, you can export your layout. Click on
 in the menu. If the program asks you if you want to save your album, click yes. This screen appears:
We want to export to jpg, 3600*3600 pixels.
Where do you want to save your layout? Click button CHANGE and choose the right directory. Click SAVE. You come back to this screen.
Click button EXPORT.

Thank you so much for following my designer tip. I’ll come back as soon as possible to give other tips that will help you in your wonderful creations.
If you find this lesson useful, please leave a small comment. If there is something special you would like to learn, please comment and explain.
Don’t forget to shop my store.
2 comments:
Thank you for the nice tutorial...Just a note the Lavender Mint freebie was not free.
The Lavendar Mint Freebie is now Free.
Post a Comment